Running a Macro Using VBA
By running a macro using VBA we will simplify the learning curve for VBA. A macro is one computer instruction that results in the computer doing many different instructions. For example, by creating a button to run a macro, one instruction/command, Word could add the current date and time to the end of a document and then save it, thereby performing two instructions. It simplifies the learning curve by means of a tool in some of the Office applications, Word, Excel, and PowerPoint, called Record New Macro. What it does after turning it on is record everything you do in that application until you turn it off.
The nice part about the recorder is that after you’ve recorded something, you can, as we’ll see in a minute, see all these instructions or code and start to understand how running a macro using VBA works, and modify it or create new code.
As our first and simplest example, let’s say we write letters with Word and many times we add a line "Have a great day!" before we sign the letter. It would be nice if we could add this at the push of a button or combination of the Control (Ctrl) key and a letter. (Word has a similar feature built-in, but it is for fixed text only. Programming, you can do much more).
-----SIDEBAR-----
I’ll be using Word 2003. If there is a discrepancy between it and your version that is more than negligible, please let us know about it so that learning this will go even smoother for others. (Put link to form here)
Also, please don't try to understand every detail you'll see in some of the resulting code. The purpose of our recording macros is to see the ball park at 30,000 feet and to show you how this it can suppliment your efforts in code you write.
-----SIDEBAR-----
Open Word, go to the Tools menu, then down to Macro, and click on Record New Macro… on the Macro submenu (shorthand for these directions is and will be written as: Tools>Macro>Record New Macro…). A dialog box with the Name field filled in appears. Remember the name and click OK. You should now see a small toolbox type of window with pause and stop buttons like an audio player. If it’s in your way you can drag it to somewhere else by its title bar. If you close it by accident, when we're done, you’ll find the Stop Recording button in the menu where the Record New Macro button was previously.
OK, now type the words "Have a great day!" (without the quotes) and then click the Stop button on the recorder.
Now go to Tools>Macro>Visual Basic Editor to see how you could have written the code yourself to automatically insert "Have a great day!" in a letter.
The Visual Basic Editor is an application just as Word is. In the right pane you should see something like this:
Sub Macro1()
Selection.TypeText Text:="Have a great day!"
End Sub
(I have deleted lines that start with an apostrophe. They are Comment lines and are not executed by your computer. You may use comment lines (whereever you wish) as reminders for what you are doing in the lines that follow the comment.)
Here we have two points of interest:
• The text above is called a block of code. A block of code when run, is executed line by line. We’ll see later that you can control the order if you need to. This block begins with the word "Sub" followed by its name "Macro1" and then "()". While we are learning and working with macros, the only thing that is important in this line is the name of the macro. The block of code is ended by the line End Sub.
• The other line of interest to us is:
Selection.TypeText Text:="Have a great day!"
"Selection" is a Keyword for Word telling it that on this line we are dealing with a selection in the document. This is either where the cursor is at the moment or anything that is selected at the moment, which is actually another way of it defining the cursor position – a Keyword is a word that an application recognizes. It must be typed correctly to be acted upon.
The period after it says that what follows is what we want to do at the cursor position. We want to type the words "Have Have a great day!" and after the Keyword TypeText followed by a space, Word is looking for what we want to type.
Running a Macro Using VBA - Part 2
When Word records for us it is deliberate about how it types and in this case it added the letters "Text:=" which isn’t needed. For the most part you won’t need to supply arguments to a command this way so we won’t learn about this style of specifying arguments called "Named Arguments" here. This command takes only one argument. For a command that takes more than one argument the editor (Visual Basic Editor) will prompt you for each one in the order that the command expects them. To see how easy this is lets go to the editor.1. Start a new blank line with the word "selection" (you don’t have to capitalize the word. The editor is case insensitive and will correctly capitalize all of its Keywords when you press enter after typing a line.).
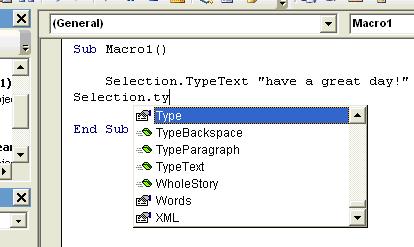
2. After the word "selection" type a period adjacently (with no space between) "selection." When you type the period, Word checks if it recognizes a keyword before it and if it does it will show you a list of keywords that can legitimately follow it. Now type the letters "ty" and you should now see the keyword TypeText in the list.

The green symbol to the left tells you that TypeText is an action (called a Method) that will be applied to the current selection in Word. You can double click TypeText or use the down arrow to select it and press the spacebar to insert it into your code.
3. As with the period after a keyword, now a space will invoke the editor to tell you what it is expecting. It is expecting Text as a String; a String is any number of typed characters and must be enclosed in quotes "". Type a quotation mark, followed by some letters, numbers, spaces, or whatever and then end the string with another quotation mark.
Running a Macro Using VBA - Part 3
Let’s learn one more thing about lines of code and then we’ll run this macro…
Everything in this line is very precise except, of course, whatever you typed in between the quotes. However, being surrounded by quotes makes it precise because in this case Word was expecting "something" surrounded by quotes. This act of being precise is called Syntax. Code with any syntax error will not run. To run, code is first Compiled (transformed) to a language that your processor will understand. This happens in the background behind the scenes. However, the editor recognizes these mistakes and will prompt you by means of a dialog box and changing the font’s color in the line to red when you press Enter at the end of the line. The message will tell you what the problem is.
After you have worked for a while with the editor you can turn off the display of these messages by going to Tools>Options and deselecting the first tick which is called "Auto Syntax Check." The line will appear in red either way if there is a syntax error in it.
Type a letter after the second quote at the end of the line and press Enter to see what happens when you have a syntax error. Delete the letter to correct the syntax. You should now have two lines within the Sub Macro1(), End Sub block as follows:
Selection.TypeText Text:="Have a great day!"
Selection.TypeText "whatever" ‘ you can also...
(you can also use the apostrophe to signify a comment at the end of a line of code. If you typed in something other than the word "whatever," that is what you will see here.)
Spaces before and after a line of code are OK and can be used to improve the readability of your code, as we’ll see later.
OK. Now we’ll run the macro.
Go to the Word document that you created the macro in.
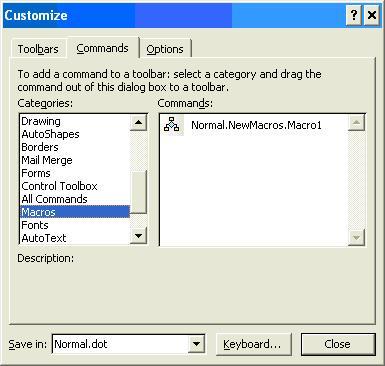
Since we want to run this macro occasionally while typing letters, we’ll need to add a button to the toolbar. To do this right click on any toolbar button or grey space in the toolbar. A long menu will appear of all the possible toolbars you could add to Word. At the bottom you’ll find the word Customize… click on it. The Customize dialog box should be displayed with the middle tab "Commands" selected to the foreground. Scroll down in the list on the left and select Macros. In the left pane you should now see a list of macros you’ve created. In this case you should only see the one macro that we created:

Drag the macro to anywhere in any toolbar. The menu bar at the top is also a toolbar. As you progress upward you’ll see an X by the pointer until you clear the dialog box, where upon the X will change to a +. When you are over a place on the toolbar where Word can insert your new button, the vertical insert bar will appear. Release the mouse button to insert the button.
While the Customize dialog box is open you have control over the toolbar buttons. If you right click on the new macro button you will see options to change how it is displayed, with or without an image or text and what image and text are used. When you create a fully functional macro for you you can customize the button.
Close the dialog and click on the button, the macro should run and you will see what you recorded and also the line you added.
To quickly create more macros with different text in each, instead of recording it, you can copy the block and paste it after the End Sub line and change the text. Change the name Macro1 to something else since you will receive an error message when you try to run a macro if there are two macros with the same name.
A macro name must begin with a letter, consist of letters, numbers, and/or underscores, with no spaces, and followed by ().
If the text you want to insert will take more than one line, either keep typing off to the right on the same line or add a space and (without the quotes) “& _” to the end of each line that is continued (there is a space between the & and _). For example:
Selection.TypeText "If the text you want to insert " & _
"will take more than" & _
" one line, either keep type off to the right " & _
"on the same"
A space followed by & _ tells the editor that this should be read as the same line. And, because we are continuing a string, we must add extra quotation marks in each line.
We could have run the macro using the VBA Editor itself. We will do this in the next tutorial.
End of Running a Macro Using VBA
Go to the next tutorial: Hello World in VBA
Return from Running a Macro Using VBA to Free VBA Tutorials
